Folks have commented on why am I not focusing on The Toy. Mostly it is because I am focused on The Venture, I really want her in the water ASAP!
Also I have been reading all the books I have been getting.
I've been debating on do I cut The Toy down in length or leave it as she is. I'm fairly close to the Texas border and in Texas a boat smaller then 14 ft does not need to be tagged. Since my first choice for closest possible sailing spot is Lake Texhoma, I'm thinking it would save me money.
Either way I can tie it down to the Ventures deck and go . In the back of my mind assuming the guys will want to come with, I figure we can take both and they can go do their thing while I'm doing my thing.
Since I'm going to learn how to fiber glass with the rudder, I'm seriously thinking to just fiberglass her hulls with polyester. That way I could conceivably have her in the water soon after it warms up enough to get it done.
I bought a small trailer from a neighbor cheap enough, I need it get it new tires. Putting a floor on it is a thought I have been playing with . It needs the tongue extended but that is not a big problem. The idea is use that to pull the Toy until I have a roof rack for her made to fit the Lumina or get a tow vehicle for the Venture and use that. I have a light weight hitch for the lumina.. Most of this is outside work and let's face it , winter just not conducive to out door work, even in Oklahoma.
So for all you folks out there that have been wondering whats up with The Toy, that's the latest on her.
Saturday, January 29, 2011
Saw Dust Factory : Rudder page 4 The Fiberglass Jig Continued
Last pic was one side of the rudder boards being in place in the jig for the first dry fit. I need to mention that I used two pieces of paper on this to intentionally have a lot of over lap between the jig and the adhesive, as well as over lap on top. Also note, I put the shiny side up.
If you are using most types of polyester you HAVE TO BLOCK AIR OR IT WILL NOT CURE!!!!!
MAKE ABSOLUTELY SURE YOU RESEARCH , READ AND UNDERSTAND THE INSTRUCTIONS WITH ANY PRODUCT YOU PURCHASE BEFORE YOU START YOUR PROJECT. Online tutorials, youtube how to videos, any other how to video I could find online and calling the manufacturer of the product are how I learned what I needed to know. Look at as many sources as you can find. You will get differing opinions and methods. That is good thing. It will help you figure out what will work best for you and what your comfortable with. What one video don't cover many times is covered in a different one.
When you can visualize the steps involved of what your going to do and how you are going to do it, and don't have any worries of doing it the way you have in mind because you have done your home work, you are probably ready to make your materials list and start collecting what you need.

I have been doing my own honey do's for over 20 years. Even those of us who have experience can make mistakes that, if not corrected in time, can waste materials. Now I did not intentionally mess this up, but its probably a good thing I did. It gives me a real good way to show how incredibly important dry fitting EVERY THING is.
Ladies, I don't care what it is your working on. If you are trying to put two or more pieces of ANY THING together permanently whether or not you think you may want the option to reuse those materials for something else later voluntarily DRY FIT IT before you add the adhesive!!!
This applies to any thing from wood, metal, pipe, stone etc. Had I not dry fitted this gig to the rudder, the entire project would have become land fill material.
Moral of this? NEVER , EVER, NEGLECT THE DRY FIT STEP OF ANY PROJECT!!!!!!!
Now back to progress.
This is a dry run but the instructions are for what I will do after I apply the polyester to the boards. The reason for the paper is so it will NOT stick to the jig. When I do it for real with the polyester in place I will use some cheap tape to tape the seams close.

.
Take the freezer paper or what ever you are using from under neath and fold it around the ends and over the top side of the boards. Remember to use something that will NOT stick to the adhesive. Plain old fashioned wax paper is good. Ladies this is one of those things where skills you know you have come in real handy. Just do not waste time trying to get it picture perfect. You cannot reasonably expect it to look as nice as a regular box that you wrap. Your paper will have wrinkles from the jig you normally would not have to deal with. Sloppy is not going to hurt it one bit, as long as you have the air blocked when using polyester.
If you are using most types of polyester you HAVE TO BLOCK AIR OR IT WILL NOT CURE!!!!!
MAKE ABSOLUTELY SURE YOU RESEARCH , READ AND UNDERSTAND THE INSTRUCTIONS WITH ANY PRODUCT YOU PURCHASE BEFORE YOU START YOUR PROJECT. Online tutorials, youtube how to videos, any other how to video I could find online and calling the manufacturer of the product are how I learned what I needed to know. Look at as many sources as you can find. You will get differing opinions and methods. That is good thing. It will help you figure out what will work best for you and what your comfortable with. What one video don't cover many times is covered in a different one.
When you can visualize the steps involved of what your going to do and how you are going to do it, and don't have any worries of doing it the way you have in mind because you have done your home work, you are probably ready to make your materials list and start collecting what you need.

I have been doing my own honey do's for over 20 years. Even those of us who have experience can make mistakes that, if not corrected in time, can waste materials. Now I did not intentionally mess this up, but its probably a good thing I did. It gives me a real good way to show how incredibly important dry fitting EVERY THING is.
Ladies, I don't care what it is your working on. If you are trying to put two or more pieces of ANY THING together permanently whether or not you think you may want the option to reuse those materials for something else later voluntarily DRY FIT IT before you add the adhesive!!!
This applies to any thing from wood, metal, pipe, stone etc. Had I not dry fitted this gig to the rudder, the entire project would have become land fill material.
 |
| I had to put a piece of the freezer paper, shiny side up, under it to show the gap we had at the first fit. |
 |
| As you can see, it was a significant gap that had the potential to throw the alignment of the entire project off . |
 |
| That one gap spread several inches down the rudder. |
Moral of this? NEVER , EVER, NEGLECT THE DRY FIT STEP OF ANY PROJECT!!!!!!!
Now back to progress.
This is a dry run but the instructions are for what I will do after I apply the polyester to the boards. The reason for the paper is so it will NOT stick to the jig. When I do it for real with the polyester in place I will use some cheap tape to tape the seams close.
 |
| Put a piece of your per SHINY SIDE DOWN on the area not already covered. Over lap is a GOOD THING! |

.
Take the freezer paper or what ever you are using from under neath and fold it around the ends and over the top side of the boards. Remember to use something that will NOT stick to the adhesive. Plain old fashioned wax paper is good. Ladies this is one of those things where skills you know you have come in real handy. Just do not waste time trying to get it picture perfect. You cannot reasonably expect it to look as nice as a regular box that you wrap. Your paper will have wrinkles from the jig you normally would not have to deal with. Sloppy is not going to hurt it one bit, as long as you have the air blocked when using polyester.
 |
| Make sure it covers the ends if you have any joints so air does not get in and prevent cure. |
 |
| Finish it up like a present |
 |
| I added another layer of paper on top for extra security. I don't want the paper under neath to slip. |
 |
| Add the end piece to the jig and repeat on other end. |
 |
| All boards ready to be screwed into place to let it cure. Remember if you use Polyester, it needs to not have air on it to cure properly. |
Saw Dust Factory : Rudder page 3 The Fiberglass Jig
Some where I have several clamps that should work quite well. I have no idea what happened to them. Since the "back side" is going to be made of several pieces laminated together to the "front side" I am using wood strips as a clamp.
As you can see the saw guy scored the inner sides to hold the polyester. The port side is horizontal. The starboard side is vertical. Which is which is not a big deal.
The reason for this is to make sure I do not squeeze all of the bondo out and end up with a mess and have to start over.
The jig is going to be custom built around the boards for 2 reasons.
1. We are using the same frame work for both parts of the rudder.
2. I'm not that great at things like this so, to make sure I get it right the first time, I am doing it this way.
 |
| The rudder boards are in center. The 2 thin boards on either side are the long pieces of the jig. They are the same thickness as the 2 sides combined so that when the top cross brace pieces are put on it will be a nice snug but not to tight fit. In this case that is 1 1/2 " |
 |
| Dry fit. |
 |
| Screwing it together. I used 2 screws in each joint so they would not slide and get off square. If you look close you can see me using my foot to brace the wood together for the screws. You can see a shoe at the bottom for same purpose. Ladies you can use any thing for back pressure. Was thinking about using the coffee tale by my saw guy was handy and being the sweet guy he is, he helped. |
 |
| Side one is done. |
 |
| Shows the bottom of jig by itself |
 |
| So the polyester won't stick to the jig, I have lined it with some freezer paper I had in the kitchen. |
 |
| Shows bottom of board in jug, ready to put polyester on. |
 |
| I don't know if you can see it or not, but this is a shot of the gap I got the first time I screwed in the last cross brace. I slipped and go to to tight so it did not let the wood lay down even. The good news is I caught it in time. |
Part 4 coming
Sunday, January 23, 2011
Saw Dust Factory : Rudder page 2
Just some shots of the sand job in progress
Our saw man has the back edge cut at a 45 degree angle so we will have a nice 90 on the back edge. Had hoped to do the second side of front on table saw but it only goes to a 45 degree angle so it has to be done by hand as well.
The decision to add 2 inches to width for better rudder control w made so we are adding a 2 inch strip to project.
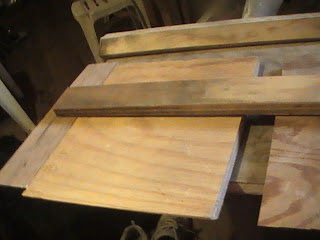
 |
| Board was really discolored form sitting out side , even under cover. |
|
| You can see splits in top layer and pitting. |
 |
| Not bad for about 5 minutes worth of sanding with coarse grit paper. |
 |
| About 20 minutes form start and we have a nice looking board. |
 |
| not to bad for an ol' gal. |
Our saw man has the back edge cut at a 45 degree angle so we will have a nice 90 on the back edge. Had hoped to do the second side of front on table saw but it only goes to a 45 degree angle so it has to be done by hand as well.
The decision to add 2 inches to width for better rudder control w made so we are adding a 2 inch strip to project.
 |
| Time to start the second front edge |
 |
| ready to start taking off wood. |
Saturday, January 22, 2011
Saw dust Factory: Rudder
Not to shabby since the price was free.
Editors Note: The management of this production would like to state that NO brand new sheets of ply wood were harmed in the production of this rudder.
Sorry but I just could not resist.
As you can see it needs some sand paper before we get to the resin stage.


Hi HO, HI HO, It's off to sand we go.....
Colorant, Gel coat and what ever else I decide to put here.
Still researching colorant for polyester resins Came across this.
They are sure proud of their colors at 7.70 an ounce but it beats having chips on the rudder. The good news is this is not an ongoing expense.
Life gets real interesting some days. While I was searching out colorants I hit on the Ace hardware site. According to the sale clerk I spoke with on the phone, if it is on their web site, you can order it and if you have it sent to the store there is no shipping cost. Interesting.....
I found these on the Ace hardware site. In the spirit this blog is built on about LOCALLY available materials. I'm throwing just a few marine worthy boat building materials that I have found on this site for your viewing pleasure. Out of fairness to Bondo, after all they did send me the samples of the Home Solutions product line, I called up Ace and asked if it was possible to order the Bondo Boat Yard resin. It's not. For any thing other then that Ace does carry a LOT of Bondo products I have not seen at other retailers. .
GelKote instructional Pdf
Not planning on gel coating the rudder right away but I'm collecting data on the subject since have places on the boat that are down right naked. When I get to that point, on this one thing I think I will splurge. If finances allow I am thinking about giving her a complete new coat of gel coat. That remains to be seen but you never know.
Non skid paint instructional pdf
ACE HARDWARE non skid paint gal SKU 1002468 39.99 special order
SKU: 1037126 gel colorant white blends with poly resins, 1 oz 6.99
"EVERCOAT" PREMIUM MARINE RESIN at a price that is definitely comparable to Bondo boat yard resin. Plus if you have then send to to the store you don't pay extra shipping.
Well its time to make sawdust. My saw guy just brought in my boards for the rudder so off w go to sand land.
Friday, January 21, 2011
Thursday, January 20, 2011
Simular attitudes from different latitudes
Was cruising on one of the forums I belong to and found this. I could not word it better my self!
I was commenting on a forum and this thought hit me like a ton of bricks.
In the days to come there will be those who know how to survive on little or nothing and those who wish they did. Give me a worthy vessel and a crew with skills in sailing and surviving at sub poverty level income and we will live like royalty, while those who have spent their life living as royalty will learn to live and die as paupers.
Budget Cruising is Not a Choice, It's A Necessity...(v2.0)
Today is about dealing with the more mundane things in life and keeping warm. Its colder then the bottom of Billy Bob's snow boots out side/ We have snow on the ground finally. That's a good thing. It means spring and warmer weather is coming!!!!!!!I was commenting on a forum and this thought hit me like a ton of bricks.
When I consider what I have learned in life living at a sub poverty level income has a perk money not only cannot buy it actually prevents one from having.
Tuesday, January 18, 2011
CONSUMER ALERT!!!!!
CONSUMER ALERT!!!!! READ THE MSDS on any product if someone tells you it is the same as another product BEFORE YOU BUY!
Well I thought I was good to go on the rudder for doing the fiberglass this week or as soon as the weather warmed up. It turns out there is some sort of mix up with the bondo samples that were sent so it appears that completing this part is going to have to wait until payday. I have an email sent to the tech I have been talking to so will see what happens. People make mistakes. It's not a big earth shaking deal. If I sound ungrateful it is because THIS IS SO frustrating!
As stated through out this blog, I have WAY to much Scot in me to waste the samples sent. I have been thinking on this. What I am going to do is use the NON marine stuff sent on the inside to laminate the boards together where water will not touch them and use the BOAT YARD on the out side. If I do it right the inner NON marine grade bondo will never see water, so it will be fine.
I am still going to use the Boat yard product line since it is a lot cheaper then the other fiber glassing epoxies. If it was not for price difference I'd go with the west or systems 3. I'm going to test it and see if the rudder holds up. Why am I being so hard headed on this? It is MY BOAT we are talking about here. I'm not expecting that every one I deal with have the sailing bug but sheesh!
I did the research. The end user sources online ALL agree, the NON MARINE grades of bondo are TEMPORARY for marine use, same as using duck tape and a piece of cardboard wrapped in a zip lock bag or a piece of ply wood with a water proof 5 minute epoxy to get you to shore are temporary fixes.
I asked about using the tempera paint as a substitute since finding marine grade materials is not so easy in this land locked location. According to the same gentleman who told me the samples sent are identical in nature as the boat yard line, TEMPERA is not a good idea since there is no way to know what fillers etc they put into the tempera. Some additives will prevent bondo products from curing! According to this same tech support person, I can use 3 ounces of the strongest universal paint tint they have at any place that tints paint such as HD or Lowe's (for white) and it will color one gallon of Bondo to opaque. If he is correct on this issue we have a source for cheap custom colors. The question is do I want to trust him on this after the mix up on the other or not. I HATE being put in this kind of a position!
Cold hard facts time. We are talking about a rudder, not a hull. Do I want to take the time to rebuild a new rudder if he is WRONG on this as well? I did a search for bondo colorants, I went to their site. That site is NOT user friendly. I got tagged for a survey and I actually did it. I gave the web site related questions 1 on everything,. If I could have given zeros I would have. After going through the process of adding a - minus sign to all the various NON relevant terms and items that came up I found NO link to colorant so I guess they are not making marine colorant any more.
Bottom line, I have entirely to much Scot in me to waste time on a product the I have reason to believe might let me down later when I need it the most. I'm putting a lot of work and materials into this rudder and I'm not going to risk bad advice for false economy over the cost difference of proven colorant vs non marine paint colorant..
I have looked up universal marine colorants in bulk. I found nothing that was specifically mentioned as for marine use so I'm back to getting something probably from jamestown. Granted I did not search through all the zillions of links but then I'm not into spending hours upon hours looking for this type of item.
If I can find a cheaper source of MARINE grade tint that works with bondo I'll let you know. If bad comes to worse and I POSITIVELY HATE this idea. I'll forgo the colorant and just paint it with marine grade paint. Chips I'll just have to keep on top of so it does not look shabby.
Repeat after me. It's about getting in the water!
I decided to submit this question to yahoo answers.
Will see what happens.
New Rudder part 1, Not to shabby for an Ol' Woman
I want to start this page with a THANK YOU to my son who is letting me monopolize his cam corder for all these photos! I could not be posting this blog with out it.
As it turns out I have the wood to build a new rudder after all. Who knew?
There is part of an old interior solid core door in the pile out side that is actually in good shape. and enough large chunks of 3/4 inch plywood to put the two together and make 1 1/2" thick boards. I was going to use foam board to make it the required 1 1/2 inches to avoid having to piece meal the other side together. It occurs that shaving all that foam is not going to be fun plus the ply wood and door wood going in different directions, if I remember anything from engineering tips I've picked up over the years, it seems to me having them going perpendicular to each other makes it stronger structurally. All you engineering guys, feel free to jump in here if I am wrong.
BONDO ISSUE
I did some research on the "BONDO' issue. Turns out they have a marine grade polyester available that come with hardener for a LOT less money then the epoxy. Google Bondo® Marine Products™ Boatyard Resin. or go to JamestownDistributors.com/Bondo. Yes, I know I'm gonna catch some slack about this. Why am I doing it?
1 I'm the one paying the bills on this boat. I can go the polyester route and be in the water or I can wait to save up for epoxy.
2. This is about sailing not sitting here waiting to save money.
This ol' gal sitting in my driveway is made of the same stuff and she is 40 years old so I figure this rudder should last a while especially if I take care to do it right. I am going to do the thing where you over drill holes by making them a size or two larger then you will need for your bolts, fill them with the resin, let it harden, then drill the hols to the proper size. to protect the wood.
If any one who disagrees strongly enough, would care to relieve me of that responsibility and take over the in pocket financing I'm good with that. Just go to the contact page and send your donation to the email address through paypal. Enough epoxy to do the rudder is going to cost about 100.00 by the time it is all said and done, Shipping is really expensive). Doing it with the boat yard bondo is less the 25.00. That leaves money for other things, like bottom paint and tint. I'll use the money I was going to spend on bondo for paint. Nuff said?
Paint for rudder. I think I'm going with the marine grade RustOleum for the same reasons. It's not what I WANT to do but, it will get me in the water faster.It's not like scrubbing ff a 22 foot hull was going to be hard work if it is kept done. It wl be a good excuse to go swimming.
Tinting epoxy. I was cruising the Jamestown site and noticed a page for tinting epoxy. I think it was west epoxy they used for this. According to that page you can use plain old fashioned CHEAP tempera paint to tint that particular epoxy. Hello CHEAP custom colors! I called up Bondo to see if it works with their product. That particular office I needed for tech was closed since today is Precedents day. I left a message so will find out tomorrow.
The New Rudder
Yes cutting this on the table saw would be faster and easier. The guys are not available today, I'm NOT using a table saw until I KNOW how to do it right. This is one of those days where I NEED to do something on this boat TODAY or I think I'll go nuts, so for now I'm using what I have as far as tools, I did this with a felt tip, a small hand square, a straight edge and a Dremel.  |
| Board one side one. This is the wood from the interior solid core door. I have the area wood to be removed marked. |
 |
| I did not think about photos until I had done a part of it but here it is, after marking a line along the board to show where to stop removing wood, I used the cutting wheels to put grooves in the wood. Yeah, it did more burning then cutting but it still got the wood removed so I'm not kicking about it. In hind sight, if I had it to do over again I think I would spring for the extra money for a saw blade to fit the Dremel. They have the one that fits as an after market thing I found at Ace for 16 dollars and change. I seriously though about it. The 5 pack of EZ lock cutting blades with the mandrel was 12 something. The refill pack of 12 is 22 and change. The reason I decided to go with the EZ lock was, I only had 20 dollars to put into this. I was scared that my hand would slip and I would break the metal blade.That would put me dead in the water. I did not want that to happen. The regular fiberglass cutting wheel that came with the Dremel. will work but they broke a lot faster then the EZ lock blades. I don't know if it is me or what, but some only lasted a couple of minutes then disintegrated. Probably a user problem but that is what happened. I think it is because the EZ Lock are thicker plus they have some sort of coating on them the regular cutting blades do not have. They are also larger so I could make deeper cuts. I wore out two EZ lock blades on this side but none of them broke so it was a good investment. I'm seriously thinking about getting the metal mini saw blades any way to have on hand. Seems like they will come in handy for other things I have not thought of yet. . |
 |
| I started from the other end but I wanted to show a shot of just having a long line of cuts made ready for the next step. |
 |
| You HAVE to be VERY careful at this point to not take off more then you want as once cut you can't put it back. Board extenders just do not work in this application. Under kill is the word for this,. I left a LOT to be removed at the next step.The key to this step is KEEP IT ALIGNED WITH THE ANGLE YOU SET ON THE END AND DO NOT PUSH THE BLADE. LET THE BLADE DO IT'S JOB AND GO SLOW!!!!!!! Do NOT I REPEAT, DO NOT try to cut it off even all the way to the line you marked since you will cut to deep and have removed more then you want by the time you grind it even or have a deep ridge to grind down which messes with your line as well!!!!!. |
 |
| Looks really rough, but progress is progress. See what I mean about not taking it down all the way at the line? |
 |
| The next step is the grinder to get it smoothed out some. It took off the high spots and removed the nasty brown burns marks of which there were plenty! I tried using just the grinder to take off all the wood in one spot just to see what would happen. It wore out a brand new grinder roll in about two minutes and did not cover that much ground so I went back to using the cutting disk and doing this in two steps.. |
 |
| Before grinding on left, After grinding on right. At far right is the start of where I had already started sanding it down to get it even. |
 |
| Shot showing all four steps in progress, from left to right, initial cuts made, tips cut off with cutting wheel, grinding done and sanded closer to flat. You are going to notice on the far right edge the wood cracked. I got in to big of a hurry to get the edge to a knife sharp point and did not have that part of the wood supported properly when I put the sander to it. The good news is the epoxy covers a multitude of sins. It will have back pressure from the other board once it is laminated so it is going to be OK. |
 | |||
| Making serious progress. Final shots of board rough sanded YIPPEE!!!!!   The guys are tired of hearing the Dremel and sander going at all hours while I'm doing this so hopefully that will motivate them into getting the table saw out in the morning. LOL Ladies, if I can do this so can you . It took me all day but that was working on it for a while, going to do something else while I took a break and let the air clear from all the dust, then going back to it. If I had clocked my time on this I'd say maybe three or four hours actual time working on it. Everything I used on this I bought at either wally world, ace hardware or a home improvement store like Lowe's or Home depot, .so it is doable. That puts it with in keeping of the theme of this blog about boat work using locally available materials. WEAR EYE PROTECTION AND A BREATHING MASK! They are cheap at any local wally world or home improvement center! If you don't your not going to like the fact you keep wanting to blow your nose! This stuff is nasty! Not to bad for an old woman huh? UPDATE on The Toy I decided since the Bondo marine resin is so cheap to give the wood to my son for his PDR and just go ahead and resin the out side of hull # 1. According to the Bondo people I should be able to order it from one of the local auto part houses here locally so we will see. I get not available due to location a lot in regard to marine grade stuff a LOT around here in south west Oklahoma. Not enough demand is what they say. OK I can see that. This is a land locked area. They have quotas and profit per square foot of floor space and stuff like that to deal with . If nothing else I'll order it from James town and let the locals lose the profit.No biggie. Get Brave, build or rebuild a boat and go sailing. |
Sunday, January 16, 2011
Foam Experiment Update
I put the foam in the water on January 8th. It is 8:30 AM January 16, 2001. There is no sign of water infiltration in any of the four pieces of foam. This includes the sides that are not sealed by oxygen contact in the canned foam. Granted it has only been a week since the experiment was started but, my opinion is even with a sever hull breech, if you have enough foam, you should be able to get back to land on a coastal cruiser using the canned foam to fill in voids for added flotation.
This is my NON PROFESSIONAL OPINION. I am showing my personal research and am not able to take responsibility if you try this one your own. Research this topic your self from all available sources before you make the decision to emulate this as each boat and each situation is different. .
Updated book reviews
Saturday, January 8, 2011
Update in general; Interior and flotation experiment
This week has been about getting things ready so that once the weather warms up I am good to go on projects. Ordered some more books. Ordered a Davis 3 sextant. It is plastic and I'm not wild about that but it works and I have heard good things online about his brand so will use it to learn and once I can afford a metal one I'll keep this one for back up or life raft. Got epoxy for the holes in the deck / hull connection. Decided to fill in the holes and put the screws back in the original spots to see how that does.
Instead of sanding out the entire interior I am going to hit the loose spots and insulate it . Seriously thinking about foam that has aluminum on one side. I already have one sheet. Based on what I have seen online where others have used a foil based insulation, it should show up like the QE 2 on radar. Plus it will add to flotation.The question is what do I want to use for covering the foam sheets? The jury is still out on that question. The big thing is making sure it is sealed so those dirt daubers don't get free condos behind the walls like they did on the trim board I took off. Silicone caulking should do the trick there. The question is how to compensate for the inevitable condensation that occurs on the inner hull. I saw a web site that addressed that issue but do not remember where, Have to look that one up again.
A lot has been said about the fact no foam is 100 percent water prof and that it will all eventually soak up water and increase load, making the boat sluggish. This is true and there is no getting around it, if water gets next to your foam. It seems reasonable and someone please, correct me if I am wrong, that the thing to do is take what ever precautions possible to keep water and foam separated.
I have been debating on how much flotation to add. I am thinking the thing to do is take measurements of how much is still in the stern. That part is easy. It is a large rectangle. Filling in the couple of inches in the top that is empty will add a considerable amount. My bright idea on that is using displacement to see what is already there and adding to it. I an planning on filling up a large rubber made tub that I have about half way with water, mark the water line, then put the chunks of foam in while forcing them under water with some landscaping net that I have on hand ( if that works) or a cut out of plywood (if the netting does not work) until they are all just below the surface of water level and marking the place the water comes to. Measure the distance between the two marks ad find out the volume of the chunks. Yes, it will take some time to get them all done but it is the best idea I can think of.
For condensation compensation I'm thinking the thing to do is put a heavy sheet of plastic down under the foam and leave the bottom inch or two empty so the condensation that collects from the hull can run to the bottom It is a down hill slope that leads to the main cabin so any water that collects should come into the cabin where I can use a sponge to clean it up. Inserting a small hole and a short stub of PVC to allow water to pass into the cabin is a given. Fiber glassing that board is also a given. Fastening a pointed wooden dowel of the proper dimensions next to the drain with a lanyard for the worse case scenario of a hull breach will suffice. The other idea is fiber glassing the large section of foam after cutting them to dimensions that can be put in place is better but way to expensive for this boat. If I was going to build a large blue water boat I would seriously consider that option.
If worse case scenario happens since this is not a blue water boat, I should be fine long enough to get back to shore or get a tow. Expensive? Maybe. It is still cheaper then having her brought back afloat because she sank. I need to do the math to see what she actually is going to need under sail as far as figure out her true weight and allowances for gear etc. The question is do I need to take storage space and use it for flotation to be with in my personal comfort zone?
To answer the question of how long it takes for foam of different types to get waterlogged, I have set up a small experiment. I put four different types of foam in a cup of water and weighted it down. Each piece has finished surface and open celled surface. Three pieces are different weights/ compositions of regular Styrofoam I picked up for The Toy. The fourth piece I took off the failed prototype hull. It is the spray canned foam you get from any home improvement store. In salt water results may be different. Let's see how long it takes for them to get water logged in non salt water.
If my theory is correct, it should prove out that on a coastal cruiser or lake situation. you have some time to make it to shore or get a tow, before your boat flounders, which is the entire point behind flotation. The question is how much time before water soaks the foam.
Updated book review page
Instead of sanding out the entire interior I am going to hit the loose spots and insulate it . Seriously thinking about foam that has aluminum on one side. I already have one sheet. Based on what I have seen online where others have used a foil based insulation, it should show up like the QE 2 on radar. Plus it will add to flotation.The question is what do I want to use for covering the foam sheets? The jury is still out on that question. The big thing is making sure it is sealed so those dirt daubers don't get free condos behind the walls like they did on the trim board I took off. Silicone caulking should do the trick there. The question is how to compensate for the inevitable condensation that occurs on the inner hull. I saw a web site that addressed that issue but do not remember where, Have to look that one up again.
A lot has been said about the fact no foam is 100 percent water prof and that it will all eventually soak up water and increase load, making the boat sluggish. This is true and there is no getting around it, if water gets next to your foam. It seems reasonable and someone please, correct me if I am wrong, that the thing to do is take what ever precautions possible to keep water and foam separated.
I have been debating on how much flotation to add. I am thinking the thing to do is take measurements of how much is still in the stern. That part is easy. It is a large rectangle. Filling in the couple of inches in the top that is empty will add a considerable amount. My bright idea on that is using displacement to see what is already there and adding to it. I an planning on filling up a large rubber made tub that I have about half way with water, mark the water line, then put the chunks of foam in while forcing them under water with some landscaping net that I have on hand ( if that works) or a cut out of plywood (if the netting does not work) until they are all just below the surface of water level and marking the place the water comes to. Measure the distance between the two marks ad find out the volume of the chunks. Yes, it will take some time to get them all done but it is the best idea I can think of.
For condensation compensation I'm thinking the thing to do is put a heavy sheet of plastic down under the foam and leave the bottom inch or two empty so the condensation that collects from the hull can run to the bottom It is a down hill slope that leads to the main cabin so any water that collects should come into the cabin where I can use a sponge to clean it up. Inserting a small hole and a short stub of PVC to allow water to pass into the cabin is a given. Fiber glassing that board is also a given. Fastening a pointed wooden dowel of the proper dimensions next to the drain with a lanyard for the worse case scenario of a hull breach will suffice. The other idea is fiber glassing the large section of foam after cutting them to dimensions that can be put in place is better but way to expensive for this boat. If I was going to build a large blue water boat I would seriously consider that option.
If worse case scenario happens since this is not a blue water boat, I should be fine long enough to get back to shore or get a tow. Expensive? Maybe. It is still cheaper then having her brought back afloat because she sank. I need to do the math to see what she actually is going to need under sail as far as figure out her true weight and allowances for gear etc. The question is do I need to take storage space and use it for flotation to be with in my personal comfort zone?
To answer the question of how long it takes for foam of different types to get waterlogged, I have set up a small experiment. I put four different types of foam in a cup of water and weighted it down. Each piece has finished surface and open celled surface. Three pieces are different weights/ compositions of regular Styrofoam I picked up for The Toy. The fourth piece I took off the failed prototype hull. It is the spray canned foam you get from any home improvement store. In salt water results may be different. Let's see how long it takes for them to get water logged in non salt water.
 |
| Day 1 immediately after setting up experiment. |
Updated book review page
Wednesday, January 5, 2011


Subscribe to:
Posts (Atom)